4. Programming the STM32
4.1. Memory Map
In Fig. 4.1.1 you see the different FLASH and SRAM sections of the STM32L4. Also have a look at the “starter” source code:
https://gitlab.informatik.hs-augsburg.de/es2/es2-nucl476/starter
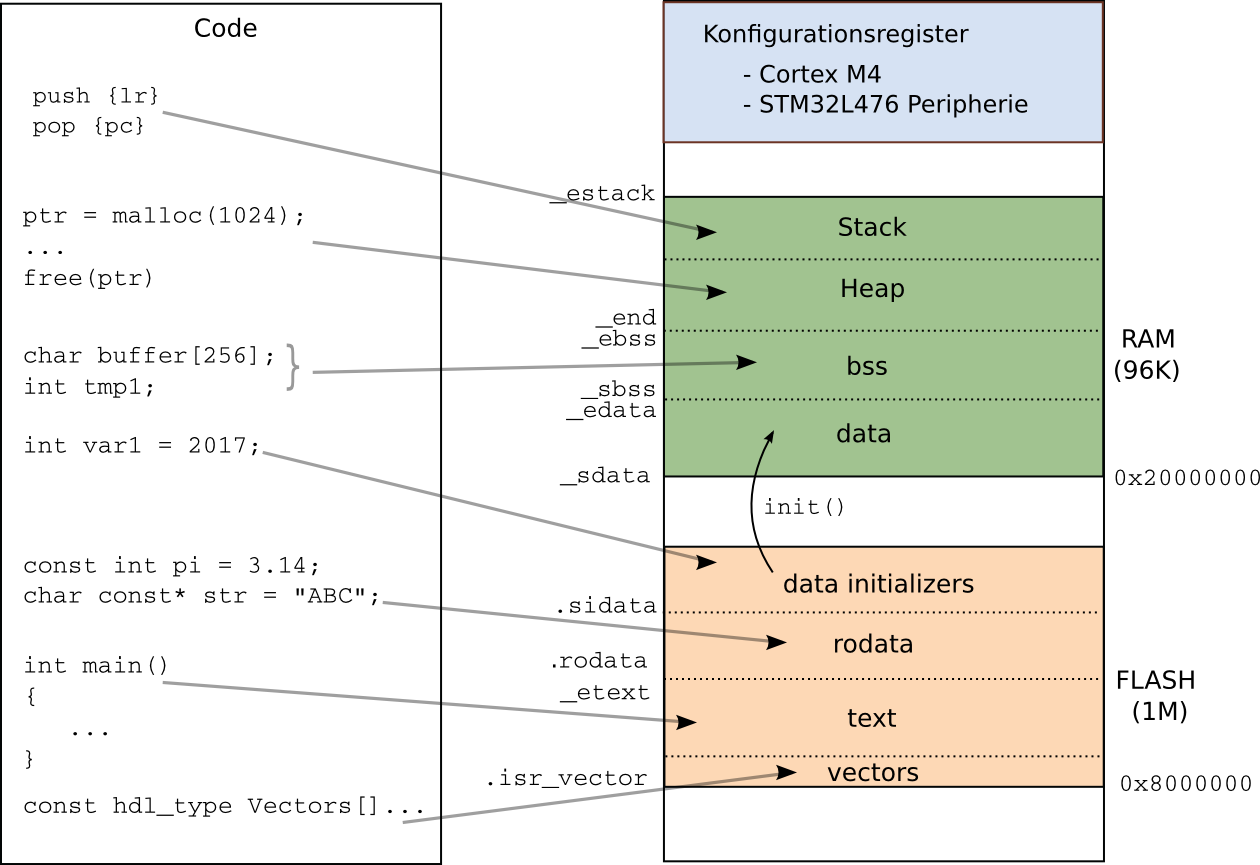
Fig. 4.1.1 The memory sections are defined in the linker script
STM32L476RG_FLASH.ld.
The first two entries in the vector table are important for the right program start:
Entry 0: initial stack pointer (sp). This vector table entry is the only vector which is not a “real vector”, which means, it is not a pointer to executable code.
Entry 1: initial program counter (pc)
You can print these two values with a GDB command:
(arm-gdb) x/2xw 0x08000000
4.2. Levels of abstraction
The following items are arranged from low to high abstraction level.
Standalone C, C++ or assembler program without dependencies to other libraries. This is the stronger definition of bare-metal programming. A more general definition is programming without operating system, but with additional libraries.
CMSIS: Abstraction of the Cortex M3 core and core peripherals. In addition a vendor specific part abstracts the microcontroller peripherals. CMSIS consists of a bunch of C header files.
STM32 Cube: Software framework with “hardware abstraction layer” (HAL) and “low layer” (LL). Cube also include the CMSIS layer.
libc: Standard C library (or libc++)
Middleware Libraries for graphical user interfaces, TCP/IP networking, file systems, realtime operating systems and so on.
High-level interpreters - for example JavaScript or Python.
The layers are often used in combinations:

Fig. 4.2.1 Levels of programming.
An overview of different programming techniques gives [YIUWAYS]. It covers Java, MatLab/SimuLink, Labview, Arduino, mbed, Finite State Machines and other programming languages like Ada, Pascal, BASIC.
Higher-level interpreted programming languages are more and more ported to microcontrollers. A few examples are JerryScript (http://jerryscript.net), eLua (http://www.eluaproject.net), Espruino (http://www.espruino.com) and Micropython (http://micropython.org).
4.3. CMSIS
Cortex Microcontroller Software Interface Standard
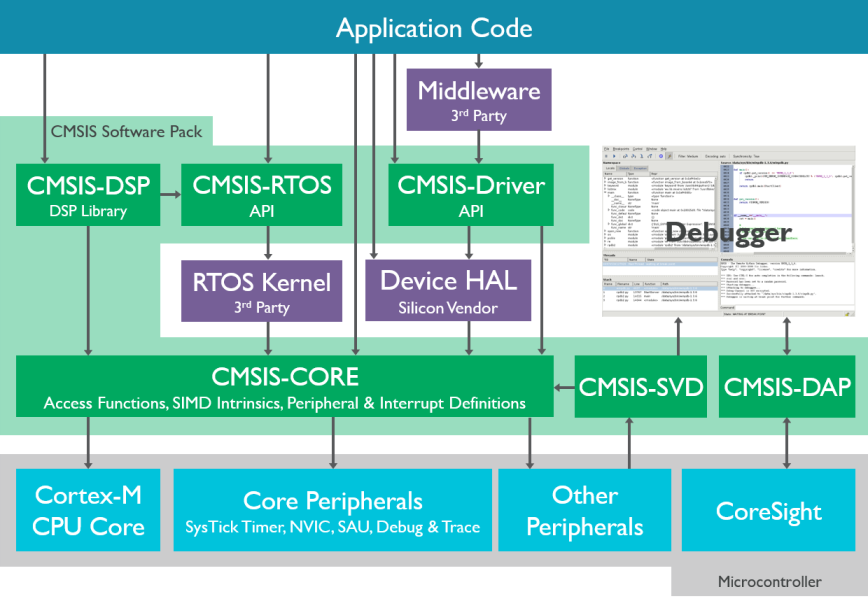
Fig. 4.3.1 CMSIS Blockdiagramm (from https://developer.arm.com/embedded/cmsis)
Versioning: CMSIS v3, v4, v5.
Cube L4 1.8.0 contains CMSIS Version 4.30.
CMSIS/Include/core_cm4.h
Definitions for APSR, IPSR, xPSR, CONTROL, NCIV, SCB, SCnSCB, SysTick, ITM, DWT, TPI, MPU, FPU, CoreDebug.
CMSIS/Device/ST/STM32L4xx/Include/stm32l476xx.h
Definitions for Exception-Nummer, ADC, CAN, CRC, DAC, DFSDM, DBGMCU, DMA, EXTI, FIREWALL, FLASH, FMC, GPIO, I2C, IWDG, LCD, LPTIM, OPAMP, PWR, QUADSPI, RCC, RTC, SAI, SDMMC, SPI, SWPMI, SYSCFG, TIM, TSC, USART, VREFBUF, WWDG, RNG, USB_OTG.
Templates for startup code. The standard startup file in CMSIS is written in assembler (
startup_stm32l476xx.s). It could also be written in C. The startup code callsSystemInitwhich is defined insystem_stm32l4xx.c.Documentation in Cube Library
STM32Cube_FW_L4_V1.8.0/Drivers/CMSIS/Documentation/Core/html
Files
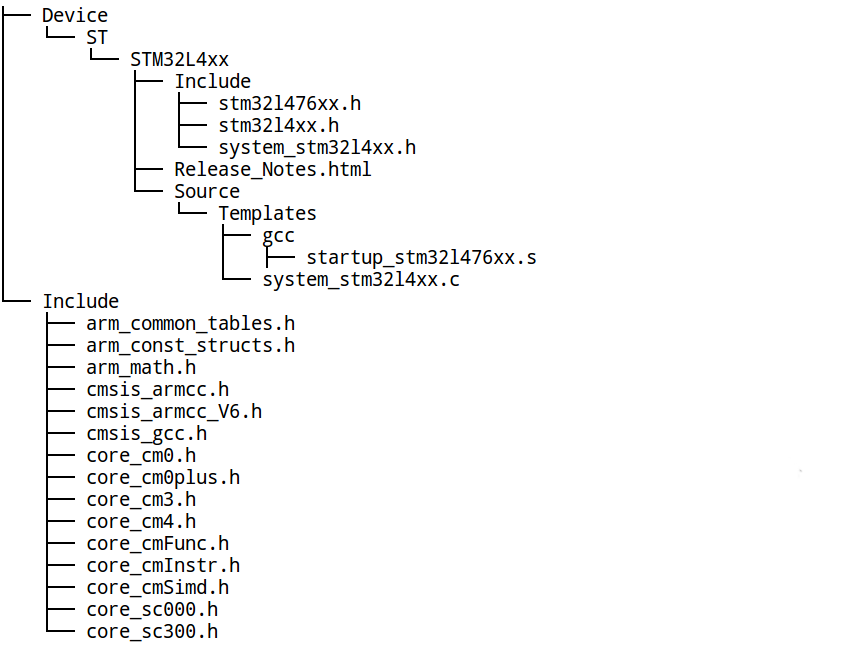
Fig. 4.3.2 Essential CMSIS files of version 4.30.
You find the CMSIS file tree in one of the CMSIS projects ending with
-cmsis, e.g.starter-cmsisorgpio-intr-cmsis.Literature
Homepage of the CMSIS project: https://developer.arm.com/embedded/cmsis
[CM4PM] contains the most important CMSIS definitions.
Trevor Martin, The Designer’s Guide to the Cortex M3, chapter 4 “Cortex Microcontroller Software Interface Standard”, pp. 109 - 139. Chapter 6 “Developing with CMSIS RTOS”, pp. 165 - 216, [MARTIN].
Doulos CMSIS Tutorial
4.4. Cube L4
Attention: This is a very large file (ca. 800 MByte)
It consists of
Hardware Abstraction Layer (HAL)
Board Support Packages (BSP)
CMSIS
Middleware
Example programs
A smaller version in which I removed some unneeded material is here:
https://hhoegl.informatik.hs-augsburg.de/es2/tools/
See the file
stm32cubel4-1.8.0-small.tar.bz2(ca. 110 MByte)
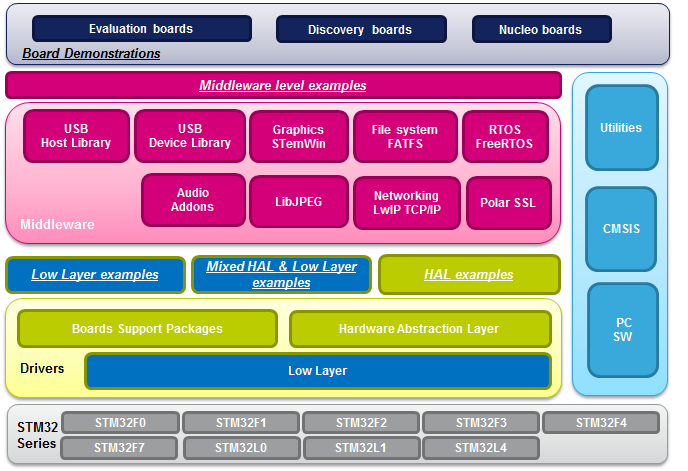
Fig. 4.4.1 The diagram comes from Release Notes for STM32CubeL4 Firmware Package, which is contained in the Cube package.
Documentation within Cube
View “Release Notes” in Web-Browser:
firefox STM32Cube_FW_L4_V1.8.0/Release_Notes.htmlDocumentation/STM32CubeL4GettingStarted.pdf (UM1860, 4/2017, 29 pages)
BSP
Drivers/BSP/STM32L476G_EVAL/STM32L476G_EVAL_BSP_User_Manual.chm
Drivers/BSP/STM32L4xx_Nucleo_32/STM32L4xx_Nucleo_32_BSP_User_Manual.chm
Drivers/BSP/B-L475E-IOT01/B-L475E-IOT01_BSP_User_Manual.chm
Drivers/BSP/STM32L4xx_Nucleo/STM32L4xx_Nucleo_BSP_User_Manual.chm
Drivers/BSP/STM32L476G-Discovery/STM32L476G-Discovery_BSP_User_Manual.chm
HAL
Drivers/STM32L4xx_HAL_Driver/STM32L486xx_User_Manual.chm
Drivers/STM32L4xx_HAL_Driver/STM32L462xx_User_Manual.chm
Drivers/STM32L4xx_HAL_Driver/STM32L443xx_User_Manual.chm
Drivers/STM32L4xx_HAL_Driver/STM32L4A6xx_User_Manual.chm
CMSIS
Drivers/CMSIS/Documentation/General/html/index.html
Literature for various application areas
UM1860: Getting started with STM32CubeL4 for STM32L4 Series
UM1884: Description of STM32L4 HAL drivers
UM1734: STM32Cube USB device library
UM1720: STM32Cube USB host library
UM1721: Developing Applications on STM32Cube with FatFs
UM1722: Developing Applications on STM32Cube with RTOS
UM1916: STM32CubeL4 Nucleo demonstration firmware
UM1919: STM32CubeL4 demonstration firmware for 32L476GDISCOVERY discovery kit
UM1937: STM32CubeL4 demonstration firmware for STM32L476G-EVAL board
UM2145: STM32CubeL4 demonstration firmware for 32L496GDISCOVERY discovery kit
4.5. Standard C library
4.6. Debugging with GDB
Fig. 4.6.1 shows the basic debug setup. The GNU Debugger for ARM connects to the OpenOCD via a local network connection on port number 3333. The OpenOCD server drives the debug adaptor.
OpenOCD also offers a telnet port as a command interface. Run the telnet
command as telnet localhost 4444 and see the telnet prompt >. Type
help to see all the available commands.
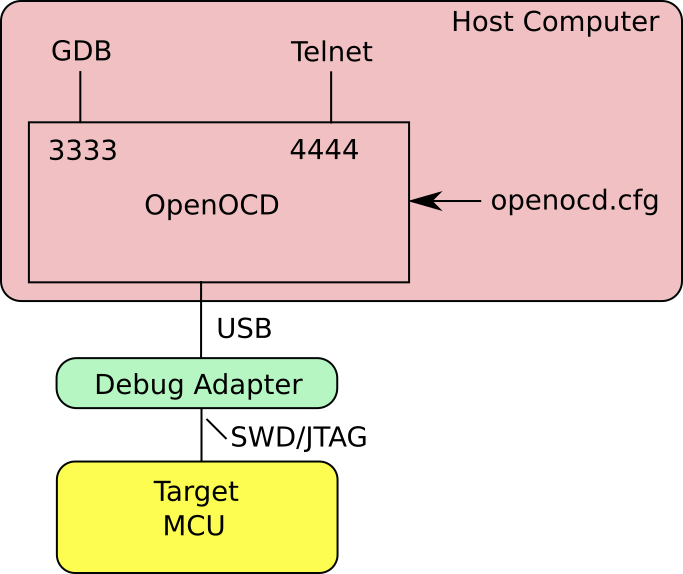
Fig. 4.6.1 Simplified block diagram of the debug setup.
The OpenOCD homepage is http://openocd.org.
OpenOCD User’s Guide http://openocd.org/doc-release/html/index.html.
Important:
Each project makefile has a target
gdb. This target loads the GDB initialisation file.estool/gdbinit.GDB shows the source code after the file has been flashed into the microcontroller (or transferred into the RAM). Your can run the command
estool -f main.binoutside of GDB or runloadwithin GDB.If the GDB command window is blocked, the program runs on the target. You can stop the program by pressing Ctrl-C. Now you can enter GDB commands after the prompt
(arm-gdb).GDB has tab completion.
GDB and OpenOCD work only as long as the Nucleo board is connected to the USB. After plugging the board off and on, you must restart the OpenOCD and GDB.
4.6.1. GDB Commands
Get help with:
(arm-gdb) help ...
Stop a running program with
Ctrl-C.Run program from start (also see GDB function
debug-programin.estool/gdbinit):(arm-gdb) monitor reset halt (arm-gdb) continue
List breakpoints. Shows a number for each breakpoint.
(arm-gdb) info br
Set breakpoint
(arm-gdb) b main
(arm-gdb) b RESET_Handler
Set breakpoint with command list
(arm-gdb) b RESET_Handler
(arm-gdb) commands
(arm-gdb) print $sp
(arm-gdb) continue
(arm-gdb) end
Delete breakpoint
(arm-gdb) del <nr>
Similar command:
clearBreakpoint with condition
(arm-gdb) br handler if count == 10
It is also possible to use the
conditioncommand.Step
Step one line or one instruction (si). Steps into functions.
(arm-gdb) s
(arm-gdb) si
Next
Next line or next instruction (ni). Does not step into funtions.
(arm-gdb) n
(arm-gdb) ni
Continue
(arm-gdb) cont
Finish to the end of a function
(arm-gdb) fini
Print
(arm-gdb) p <expr>
(arm-gdb) p var1
(arm-gdb) p GPIOA_ODR
(arm-gdb) p EXTI->PR1
(arm-gdb) p &g_bss          # to find addresses also see arm-none-eabi-nm
(arm-gdb) p main::loopcnt   # local var
Dump memory
(arm-gdb) x <addr>
(arm-gdb) x/4xw 0
(arm-gdb) x/8xw $sp
Display
(arm-gdb) disp $sp
Use
undisplayto remove displays.Set variables
(arm-gdb) set var counter = 21
Write value at an address
(arm-gdb) set *(uint32_t*)0x20002000 = 0x12345678
Switch windows: repeat
C-x 2Cmd, Src und Asm
Cmd, Src und Reg
Cmd, Asm und Reg
Set SP and PC
The following commands set stack pointer (SP) and program counter (PC). Then the program is startet (continue).
(arm-gdb) set $sp = 0x...
(arm-gdb) set $pc = 0x..
(arm-gdb) continue
The following commands are sometimes useful:
Erase Flash memory:
OpenOCD Telnet prompt:
> reset halt
> stm32l4x mass_erase 0
GDB console:
(arm-gdb) monitor reset halt
(arm-gdb) monitor stm32l4x mass_erase 0
Read and set the VTOR register in SCB (Vector Table Offset Register). This register is set to 0x00000000 after RESET.
(arm-gdb) x/1xw 0xE000ED08    # print VTOR register

(arm-gdb) monitor mww 0xE000ED08 0x20000000   # set VTOR to RAM (OpenOCD syntax)

(arm-gdb) set {int}0xE000ED08 = 0x20000000    # set VTOR to RAM (GDB syntax)
Print out the status register ``xPSR`` in a more readable form
You can define the following function in the .estool/gdbinit file:
define flags
printf "N=%d Z=%d C=%d V=%d Q=%d GE=%1x ICI/IT=0x%x Exc#=%d\n", \
($xPSR & 0x80000000)?1:0, \
($xPSR & 0x40000000)?1:0, \
($xPSR & 0x20000000)?1:0, \
($xPSR & 0x10000000)?1:0, \
($xPSR & 0x08000000)?1:0, \
($xPSR & 0x000F0000) >> 16, \
($xPSR & 0x0000FC00) >> 10, \
($xPSR & 0x000001FF)
end

document flags
Print out the xPSR register in a readable form
end
With this function you will have a nice printout of the flags in xPSR:
(arm-gdb) flags                                                                 │
N=0 Z=0 C=1 V=0 Q=0 GE=0 ICI/IT=0x0 Exc#=56
The p/x $xPSR will just print out:
(arm-gdb) p/x $xPSR                                                             │
$2 = 0x21000038